
Making a paper flower shadow box
I'm going to describe my process for how to glue flowers and leaves into a shadow box for display.
I love making paper flowers and I have been making them for over 10 years now. For the first few years of making them, I struggled with how to present and sell them. There were always problems with positioning and protecting the flowers. I was so excited the day I hit on the idea of gluing the flower into a wooden box. It immediately conjured up images of botanical illustrations and flower paintings. I love how the flower is accessible yet still isolated within the frame. Over the years I have experimented with different sized boxes, with glass or without, and with multiple species of flowers inside too. It's still my favourite way to display my flowers. I'm going to explain a little bit of my process of staging and creating a shadow box with paper flowers.
The first step, of course, is to make the flowers. Sometimes I have a box size in mind when I'm creating the flowers and I will cut the stem to the right size as I'm making it. More often I make flowers as the inspiration strikes and then try to find a box to put them in later... If I'm working on a custom order, the client has already told me what size they would like so I make the flowers to fit. Once the flowers and leaves are made I find my box.
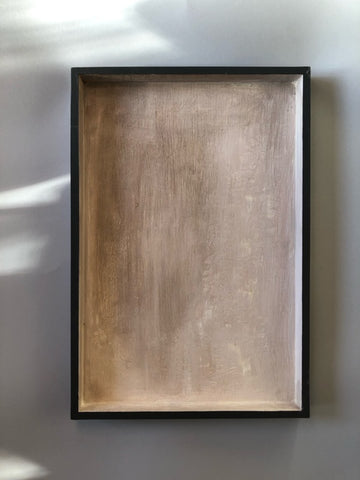
I've been trying to upcycle old wooden boxes and frames as much as possible. I love the idea of reusing but it does mean a little more work getting the box ready. This box was one half of a backgammon set! I sand the wood and fill any holes, and then paint it inside and out with latex paint, sometimes mixed with acrylic paint or pigments. I like texture on the inside so I will add some venetian plaster, plaster of paris, or even sand to the paint. I love this step! After the fussiness and careful work of flower making it is freeing to paint big bold strokes of colour into the box.
Next I affix some hanging hardware on the back. I have been using claw type hardware because it is the easiest to affix to the back of the box. Sometimes I forget this step and curse myself later. Once the flowers are glued in, it is MUCH harder to hammer in the little nails on the back!

Now it's time to position everything in the box. In this case I have lots of elements so it took a little longer. Often I take pictures as I go because I have to remove the pieces again to add glue and a photo helps me remember where I intended to put them! If I'm working with flowers, I will bend the heads to face outward or position leaves to cover parts of the stems. This is also the moment to make any last minute changes to the flowers. If I want to add any last details or fix anything, I do it now before they are glued in. I love having some element of the piece sticking out of the frame or overlapping the sides. I pay attention to the negative space around the flower and the flow of lines through the composition.


Once I am happy with the layout, I remove each element carefully and put white glue on the back of each piece where it will touch the box- usually the stem and the back of one petal. I also put a little glue on the overlapping pieces, where flowers or leaves touch each other. I used to use crazy glue for this step but I like how white glue gives me a few minutes to reposition things before the glue sets.

The last step is waiting for the glue to dry. My least favourite part! I will gently set something onto the paper to weight it down.

Once the glue is dry I test to make sure everything is secure and then I can hang the piece up! If I'm sending the piece out, I will do the gluing at least two days before packaging to make sure everything is solid.
That's it!
